Find out how to take great photos, at sunrise, at noon or at sundown. how to set your exposure accordingly
The exposure of your image detector to the film, is the most important factor in your photography. This is, exactly, why, there exists a photography school which called itself "The Exposure School". Find out how to
take wonderful photos by changing parameters in your camera, which determine the amount of exposure.

What affects the exposure in photography
There are three essential parameters which determine how exposed to light the sensor is:
- Lens Aperture– the lens aperture (hole or opening) determines how much light will enter the camera. The bigger the aperture, the more light gets in (similar to a window – the bigger it is, the more light it lets in). For more details, read about the lens aperture.
- Shutter Speed – the shutter speed determines for how long the shutter of the camera will remain open , thus, allowing light to enter the camera. Let's go back to the example of the window – if the window is big, it's good, but the shades need to be open for light to penetrate. If the shades remain open for a long period of time, the room will be exposed to more light, then if the shades open and close immediately. That's how it works in cameras. For more details: shutter speed.
- Film Speed – the film speed, measured on ISO numerical scale, tells you how sensitive the film of the camera (or the sensor) is to light. The bigger the ISO is, the sensitive the film is, and the picture you take will be brighter. Want to know more: Film Speed
In conclusion, if you want a brighter picture, you have three ways of doing so: to open up the lens aperture, to slow down the shutter speed or to choose a more sensitive film. Obviously, you can add more light to
your picture by simply taking it in a brighter environment or by using an artificial light, such as a light-bulb or the camera's flash.
What is the right exposure for your photographs
There is no such thing as the right exposure, because every time you are photographing, you have a different set of conditions. You may have wanted a dark photo and that's why it came out so dark, but you may have,
also, wanted to emphasize the amount of light you have in your balcony, and that's why your picture turned out a bit "burnt". "The right exposure" is a volatile concept – only you know what the
exposure you want is, and only you can achieve this exposure, so you have to decide what your desired exposure is, before you even begin to take your pictures. It is customary, in photography courses, to explain that
an overexposed picture is a picture, where the objects are so bright that you can hardly see their details. Conversely, underexposure happens when you can't see the details of the object in a picture, because
it is too dark.
In most recent cameras, there are photoelectric sensors which measure the amount of light in the frame, and then, decide for you, what are the right parameters for the lens aperture, the shutter speed and the film speed.
These photoelectric sensors, also, decide whether to turn the flash on or not. Despite that, you can still decide to set the exposure parameters manually.
Standard values in order to achieve the right exposure
If you increase the shutter speed, you let less light enter into the camera. When you do that, your camera "compensates" for the low amount of light by opening the lens aperture automatically. For that reason, the
higher the shutter speed is, the wider the lens aperture will open. Here is a table of values which, when combined, give exactly the same amount of exposure:
|
1/4
|
1/8
|
1/15
|
1/30
|
1/60
|
1/125
|
1/250
|
1/500
|
1/1000
|
Shutter speed
|
|
f/22
|
f/16
|
f/11
|
f/8
|
f/5.6
|
f/4
|
f/2.8
|
f/2
|
f/1.4
|
Lens Aperture
|
As the table shows, taking a picture at a shutter speed of 1/4sec, with a lens aperture of 22/f, will yield a picture, which is exactly as bright as a picture, taken with a shutter speed of 1/1000sec and a lens aperture of 1.4f.
So if the amount of light is identical, what is the difference between those pictures?
The difference can be seen in other element in the picture – A shutter speed of 1/1000sec is very quick so the objects in this picture will appear to be
sharp and "frozen". On the other hand, a shutter speed of 1/4sec is rather slow, so the objects in this picture might look "smudged".
If you take pictures of little kids playing in the backyard, those two pictures might look entirely different, even if the exposure is identical. In addition, a widely opened lens aperture decreases the
depths of field, or in simpler words, "a smaller portion of the picture will appear focused". This means that if you take a picture of your kids running in the backyard, only some of them will be in focus,
while the others will look blurry, because they were either too close to, or too far from the point where the camera was focused on. On the other hand, a small lens aperture increases the depths of field, which means that
both objects that are far from the camera, and objects that are near it, will appear sharp in the picture.
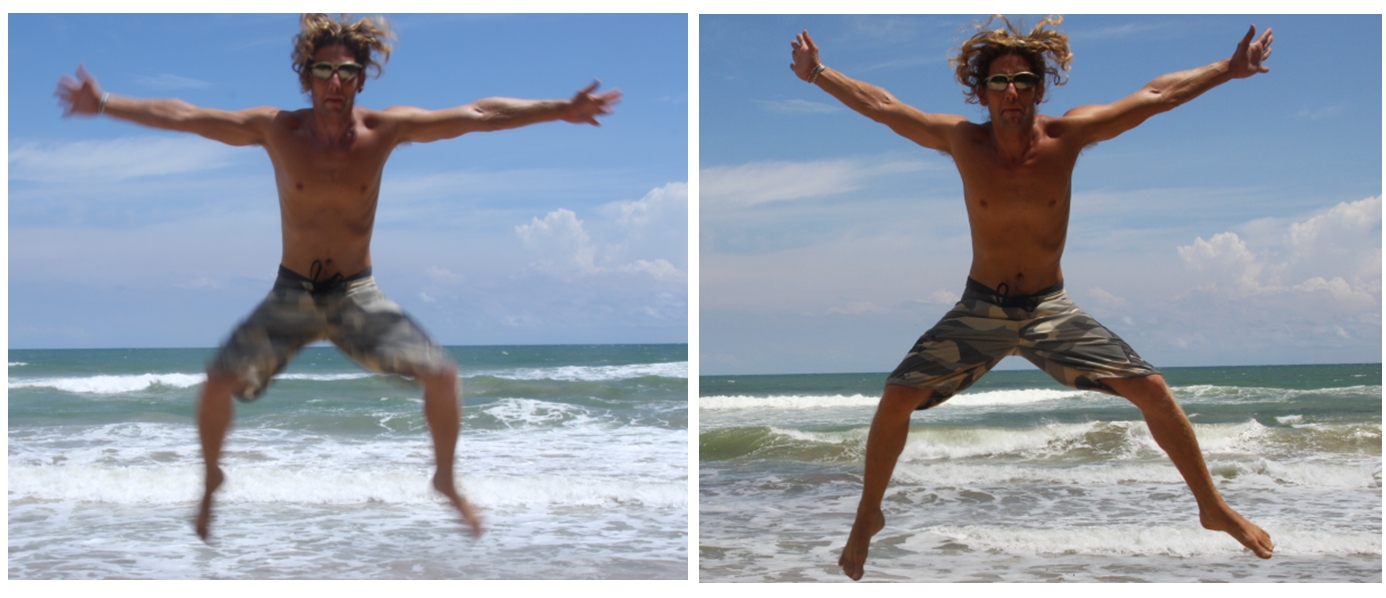
The two pictures above show that, even though the exposure was identical, the outcome is very different. The left pictures shows that the object in it was moving, because it is smudged, while the picture on the right shows a
"frozen" (sharp) object.
Exposure Compensation
An Exposure Compensation is a way for you, or for the camera, to compensate for the lack or abundance of
light. When we narrow the lens aperture, the camera will compensate for the lack of light, by lowering the shutter speed, automatically, in order to adjust the exposure. However, exposure compensation usually refers to
manual adjustment the photographer does to the camera, on top of the automatic ones the camera does independently. For instance, exposure compensation is done, when an object appears on a bright backround
– the brightness of the background makes the object look dark in comparison, so the camera is "confused", and sets values of exposure, that make the object appear like a shadow in the picture. In most recent
cameras, there is a button which allows you to use exposure compensation by choosing different units of exposure [from -3 to +3 in jumps of 1/3 of a unit]. The [+] units add light to the picture, while the [-] units reduce
the amount of light in the picture (negative exposure compensation), in cases where the picture is too bright for your taste.
Most photography schools teach their students to always take the same picture with good exposure, and with exposure compensation of +1 and underexposure of -1. This method ensures that the photographer will end up having, at
list, one picture with the right amount of exposure.
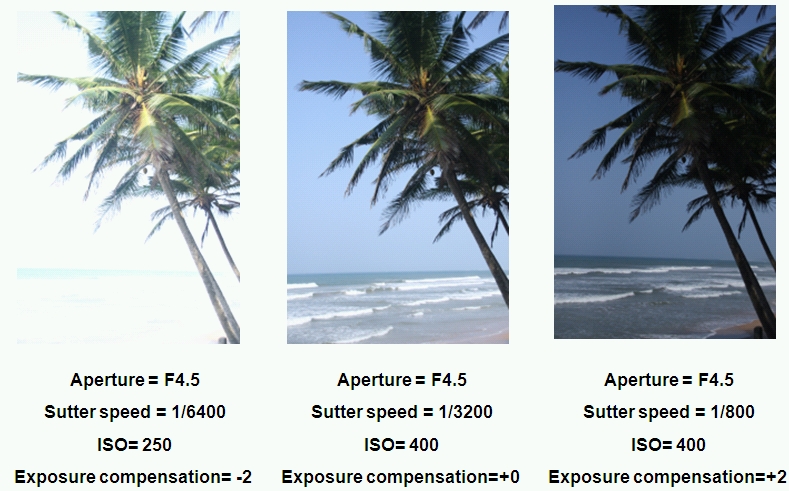
In the pictures above, we photographed the trees and the bright background (the sea) with exposure compensation of +2 (left), exposure compensation of -2 (right) and without exposure compensation (center). You can
see that the picture on the right is underexposed while the picture on the left is overexposed. In this case, you can see that the values that the camera set automatically, were actually good enough to create the
"exact exposure", and in fact, there was no need for exposure compensation.
How come bright objects or backgrounds create distortion, and how to fix it
When the photoelectric sensor "sees" a white area, it mistakenly "thinks" the photo is taken at a place filled with light. The white color confuses the sensor and convinces it to compensate for the
extra light, and the result is a picture which is darker than what you've wanted (underexposure). In cases like these, you can compensate for the "lack of light" by changing values of exposure accordingly.
Since it is not always possible to know, in advance, when will the sensor get confused, it is always recommended to take several picture with varying values of exposure compensation (also called a "compensation
range" – from exposure X to exposure Y), so that you will have, at list, one picture with the right exposure. If you see that a large portion of your picture is composed of white (or bright) surfaces, use
values of exposure compensation between 1/3+ to 2+, according to the conditions and decide, later on, which is the result you prefer.
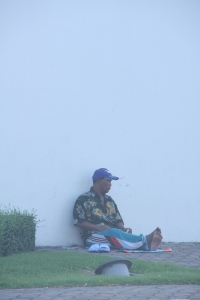
The right photo was taken in front of a white wall. The wall in it appears to be grey because the photoelectric sensor compensated for what it assumed to be an overexposure. As you can see, the man in the photo
is shadowy for the same reason. The picture on the left was corrected, by using an exposure compensation value of 1/3+, which re-whitened the wall, and enabled the details of the man leaning against it to look
sharp and clear.